Mac emulation
How to run the original Magnetic Scrolls releases for the Macs
here are different emulators for old Mac systems available, which differ slightly in their selection of emulated systems: Sheepshaver,
Basilisk II, and Mini vMac. Sheepshaver emulates a PowerPC Mac that will run MacOS
versions 8.1 to 9.0.4, Basilisk II emulates a 68k Mac that will run MacOS versions 7 to 8.1, and Mini vMac emulates a 68k Mac Plus that will run MacOS versions 1 to 7.5.5.
Since the Magnetic Scrolls games were developed during the 80's, they were available long before System 7 hit the market and indeed the games run best on a System 6 machine.
So, the preferred emulator for Magnetic Scrolls' games is the Mini vMac emulator.
Like most other emulators, Mini vMac uses images files containing the contents of the original game disks. Creating images of your original disks might be quite difficult. The early Macs used a special floppy format that cannot be read with other floppy drives (even not the later Mac HD floppy drives). So, actually you need the original Mac hardware to create the disk images, but there might even be an option to read the disks without a real Mac. With the full version of disk2fdi and a special cable, perhaps you can read Mac disks with a normal 3,5" floppy drive. Building disk images of my original Mac disks with disk2fdi worked like a charm. The images created by disk2fdi are in diskcopy format (extension .dc) which can be used with Mini vMac directly.
All the emulators mentioned above require a dump of an original system ROM. The Mac Plus ROMs are property of Apple and not freely available. At the moment the only legal option is dumping the ROM from a real Mac. For usage with Mini vMac, the rom image file has to be named vmac.rom. During the last years, it seemed that Apple has stopped pursueing the sharing of the old Mac ROMs, so a internet search might ease your pains. However, obtaining a ROM without the possession of a real Mac Plus still is a violation of Apple's copyrights, of course.
In addition to a system ROM, the Mac emulators require a copy of the Mac operating system, just called System. Apple used to make a lot of old stuff freely available on its website
in the support section, but with one of the last updates the overview page disappeared. However, at least of May 2016 the downloads are still functional, so the removal of the
download page might have been unintentional. Somewhere in the huge file area there you can find the System 6.0.8 disks. The file we need for our purposes finds here:
System 6.0.8 disk 1/2.
Note: This is only a part of System 6. If you intend to do more with your emulator like installing the system on a hard disk image, you need more
files from here, especially
System 6.0.8 disk 2/2. The Apple site carries english versions only. But versions in other languages are scattered around various servers like university archives...
an internet search should reveal plenty of sources. If the files should disappear from the Apple site, you can also get them from the internet archive.
Before we can use the system disk with Mini vMac, we need to decompress the file. The files from the Apple archives are compressed in Stuffit format. This was a popular compression
format on the earlier Macs. Today you need additional tools to decompress Stuffit files, even on the Macs. Mac users can use the free
StuffitExpander or BetterZip (Shareware). Windows users can also use the
free StuffitExpander or a tool like Universal Extractor. Linux users
should have a package called macutil for extracting the bin file in their standard distribution. Additionally there is a tool called
unstuff available, which should be capable of decompressing the archive. If the extraction is successfull, you
should get a file called System Startup. This is a disk image of the system startup disk and can be used directly with Mini vMac.
If you have mastered all the hurdles above and have all the necessary files available, setting up the emulator is easy:
First extract the Mini vMac archive to a folder on your
harddisk and copy the vmac.rom file into this folder. Now you can start the emulator by running the executable. If everything is set up correctly you should get the loading screen:
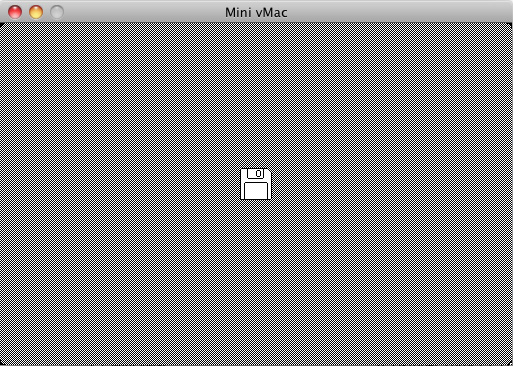
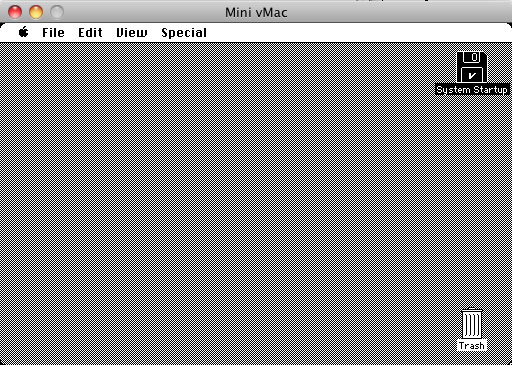
In the center of the Mini vMac screen you should see a blinking 'X'. This indicates that no System is installed, but this is easy to fix. Move to your folder where you have stored the previously extracted System Startup file, select the file with your mouse and drag and drop it onto the running Mini vMac window. The System loads immediately and you should see the Mac Finder now:
To load a game disk, just drag and drop the game disk image file onto the Mini vMac window. The disk loads automatically and an icon for the disk should appear on the desktop:

Now open the disk by doubleclicking the disk icon. A folder showing the disk contents opens...
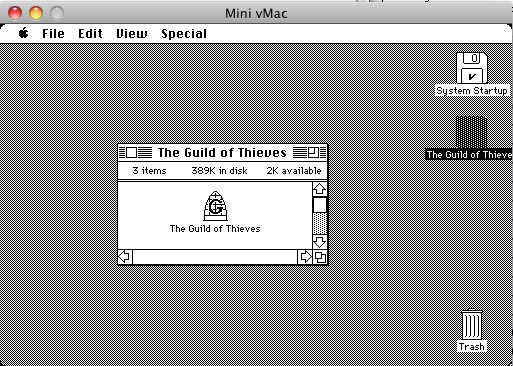
Start the game by clicking the game executable and enjoy your game...
